PCブラウザに接続したUSBゲームパッドを操作する。
ラズパイ側は python の websocket で待ち受け・受信する。
[ゲームパッド]ー[PCブラウザ]ー[Wi-Fi]ー[ラズパイ websocket]
その1.PCブラウザのHTML
ラズパイのwebディレクトリに 新しいファイル[controller.html]を作成する。
<!DOCTYPE html>
<html lang="ja">
<head>
  <title>Gamepad to Raztank</title>
  <meta charset="UTF-8">
</head>
<body>
  <h2>Gamepad Input for Raztank Python</h2>
  <p>
    Gamepad: <span id="gamepad"></span><br>
    WebSocket: <span id="websockets"></span>
  </p>
  <pre id="output"></pre>

<script>
  let socket;
  let lastData = null; // 前回送信したデータを保持

  // WebSocketイベントが発生したら表示変更
  const wsStatus = document.getElementById("websockets");
  function connectWebSocket() {
    socket = new WebSocket("ws://razpi43.local:8765/gamepad");
    socket.onopen = () => wsStatus.textContent = "接続成功";
    socket.onerror = () => wsStatus.textContent = "エラー";
    socket.onclose = () => {
      wsStatus.textContent = "切断";
      setTimeout(connectWebSocket, 3000); // 3秒毎に接続トライ
    }
  }

  function pollGamepad() {
    const gp = navigator.getGamepads()[0];
    if (gp) {
      const data = {
        buttons: gp.buttons.map(b => b.pressed),
        axes: gp.axes
      };

      const jsonData = JSON.stringify(data);
      document.getElementById("output").textContent = jsonData;

      // データが変化している場合のみ送信
      if (socket.readyState === WebSocket.OPEN && jsonData !== lastData) {
        socket.send(jsonData);
        lastData = jsonData;
      }
    }
    requestAnimationFrame(pollGamepad);
  }

  window.addEventListener("gamepadconnected", () => {
    document.getElementById("gamepad").textContent = "接続成功";
    pollGamepad();
  });

  // 初回websocket接続
  connectWebSocket();
</script>
</body>
</html>
その2.ラズパイ側のpythonコード
ラズパイ側では websocket 待ち受けし、PCブラウザからのwebsocket送信を待つ新しいファイル[test_receive.py]を作成する。
import asyncio
import websockets
import json

# デッドゾーン(微小な揺れを無視)
DEADZONE = 0.2

def get_left_stick_direction(axes):
    x = axes[0] if len(axes) > 0 else 0
    y = axes[1] if len(axes) > 1 else 0

    direction = []
    if abs(x) > DEADZONE:
        direction.append("← 左" if x < 0 else "→ 右")
    if abs(y) > DEADZONE:
        direction.append("↑ 上" if y < 0 else "↓ 下")

    return direction if direction else ["ニュートラル"]

async def handler(websocket):
    async for message in websocket:
        try:
            data = json.loads(message)
            axes = data.get("axes", [])
            direction = get_left_stick_direction(axes)

            print(f"方向: {', '.join(direction)}")

        except Exception as e:
            print(f"⚠️ エラー: {e}")

async def main():
    print("🎧 WebSocketサーバー起動中(ポート8765)...")
    async with websockets.serve(handler, "0.0.0.0", 8765):
        await asyncio.Future()  # 永久待機

asyncio.run(main())
その3.接続検査する
まずラズパイ側で websocket 待ち受け[$ python gamepad_receive.py]を実行する。
PCブラウザではUSBゲームパッドを接続したら、[http://razpi**.local/gamepad_websocket.html]にアクセスする。
USBゲームパッドの左スティックを操作すると:
PC側ブラウザの画面表示は
Gamepad Input for Node-RED
{“buttons”:[false,false,false,false,false,false,false,false,false,false,false,false,false,false,false,false,false],”axes”:[0.000015259021896696368,-0.000015259021896696368,0.000015259021896696368,-0.000015259021896696368]}
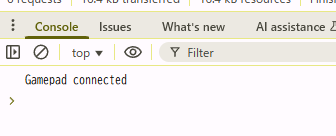
また DevTools のコンソールには下図 ” Gamepad Connected ” が表示される
ラズパイのターミナル表示は下記:
🎧 WebSocketサーバー起動中(ポート8765)...
方向: → 右
方向: ニュートラル
方向: → 右
方向: ニュートラル
方向: ← 左
方向: ニュートラル
方向: ニュートラル
以上。そしてもっとゲームパッドのキーを有効にするには:
ラズパイ側 python コードをゲームパッド全ボタン有効化
ラズパイ側の新しいファイル[test_receive2.py]を作成する。
import asyncio
import websockets
import json

DEADZONE = 0.2

BUTTON_NAMES = {
    0: "A", 1: "B", 2: "X", 3: "Y",
    4: "LB", 5: "RB", 6: "LT", 7: "RT",
    8: "バック", 9: "スタート", 10: "左スティック押し込み",
    11: "右スティック押し込み", 12: "十字 ↑", 13: "十字 ↓",
    14: "十字 ←", 15: "十字 →", 16: "ガイド"
}

def get_stick_direction(name, x, y):
    direction = []
    if abs(x) > DEADZONE:
        direction.append(f"{name} ← 左" if x < 0 else f"{name} → 右")
    if abs(y) > DEADZONE:
        direction.append(f"{name} ↑ 上" if y < 0 else f"{name} ↓ 下")
    return direction if direction else [f"{name} ニュートラル"]

def get_pressed_buttons(buttons):
    return [
        BUTTON_NAMES.get(i, f"ボタン{i}")
        for i, pressed in enumerate(buttons)
        if pressed
    ] or ["なし"]

async def handler(websocket):
    async for message in websocket:
        try:
            data = json.loads(message)
            axes = data.get("axes", [])
            buttons = data.get("buttons", [])

            # 左スティック(axes[0], axes[1])
            lx = axes[0] if len(axes) > 0 else 0
            ly = axes[1] if len(axes) > 1 else 0
            left_direction = get_stick_direction("左スティック", lx, ly)

            # 右スティック(axes[2], axes[3])
            rx = axes[2] if len(axes) > 2 else 0
            ry = axes[3] if len(axes) > 3 else 0
            right_direction = get_stick_direction("右スティック", rx, ry)

            pressed = get_pressed_buttons(buttons)

            print(f"左スティック: {', '.join(left_direction)}")
            print(f"右スティック: {', '.join(right_direction)}")
            print(f"ボタン: {', '.join(pressed)}")

        except Exception as e:
            print(f"⚠️ エラー: {e}")

async def main():
    print("🎮 WebSocketサーバー起動中(ポート8765)...")
    async with websockets.serve(handler, "0.0.0.0", 8765):
        await asyncio.Future()

asyncio.run(main())
検査結果
🎮 WebSocketサーバー起動中(ポート8765)...
右スティック: 右スティック ↑ 上
右スティック: 右スティック ← 左, 右スティック ↑ 上
右スティック: 右スティック ← 左, 右スティック ↑ 上
右スティック: 右スティック ← 左, 右スティック ↑ 上
右スティック: 右スティック ← 左, 右スティック ↑ 上
右スティック: 右スティック ↑ 上
ボタン: B
ボタン: X
ボタン: RT
ボタン: LT, RT
ボタン: LT
ボタン: LB
ボタン: RB
右スティック: 右スティック ↑ 上
右スティック: 右スティック ← 左, 右スティック ↑ 上
右スティック: 右スティック ← 左, 右スティック ↑ 上
右スティック: 右スティック ← 左, 右スティック ↑ 上
ラズタンクのモータードライバーと接続する[キーボードで操作]
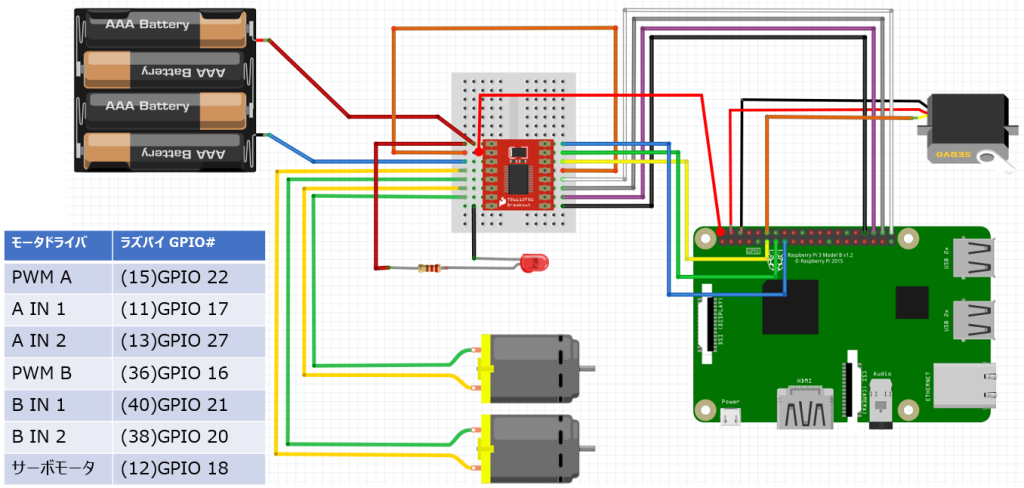
このコードは下図配線の場合です。自分のGPIO番号にあわせて変更してください。
Pythonでキー入力を検知する readchar モジュールをインストールします。
$ sudo pip install readcharラズタンクをキー操作するPythonコードは下記の通りです。
例えば[$ sudo nano tank.py]などで新しいファイルを作ってコードを書きます。
正しく入力できたら[$python tank.py]でプログラムを実行します。
操作は[w]キーで前進、[a]キーで左反転、[s]キーで右反転、[z]キーが後進です。
終了は[q]キー。
#!/usr/bin/env python
# -*- coding: utf-8 -*-

import RPi.GPIO as GPIO
import sys
import time
import readchar

constLeftPWM = 17
constLeftIN1 = 27
constLeftIN2 = 22
constRightPWM = 16
constRightIN1 = 20
constRightIN2 = 21

GPIO.setwarnings( False )
GPIO.setmode( GPIO.BCM )
GPIO.setup( constLeftPWM,  GPIO.OUT )
GPIO.setup( constLeftIN1,  GPIO.OUT )
GPIO.setup( constLeftIN2,  GPIO.OUT )
GPIO.setup( constRightPWM, GPIO.OUT )
GPIO.setup( constRightIN1, GPIO.OUT )
GPIO.setup( constRightIN2, GPIO.OUT )

pwmLeft = GPIO.PWM( constLeftPWM, 50 )  #50Hz
pwmLeft.start( 0.0 )
pwmRight = GPIO.PWM( constRightPWM, 50 )  #50Hz
pwmRight.start( 0.0 )

def moveForward():
	GPIO.output( constLeftIN1, 1 )
	GPIO.output( constLeftIN2, 0 )
	GPIO.output( constRightIN1, 1 )
	GPIO.output( constRightIN2, 0 )

def speedSlow():
	pwmLeft.ChangeDutyCycle( 80 )
	pwmRight.ChangeDutyCycle( 80 )

def speedHigh():
	pwmLeft.ChangeDutyCycle( 100 )
	pwmRight.ChangeDutyCycle( 100 )

def moveBack():
	GPIO.output( constLeftIN1, 0 )
	GPIO.output( constLeftIN2, 1 )
	GPIO.output( constRightIN1, 0 )
	GPIO.output( constRightIN2, 1 )

def moveLeft():
	GPIO.output( constLeftIN1, 0 )
	GPIO.output( constLeftIN2, 1 )
	GPIO.output( constRightIN1, 1 )
	GPIO.output( constRightIN2, 0 )

def moveRight():
	GPIO.output( constLeftIN1, 1 )
	GPIO.output( constLeftIN2, 0 )
	GPIO.output( constRightIN1, 0 )
	GPIO.output( constRightIN2, 1 )

def moveStop():
	GPIO.output( constLeftIN1, 0 )
	GPIO.output( constLeftIN2, 0 )
	GPIO.output( constRightIN1, 0 )
	GPIO.output( constRightIN2, 0 )

def end():
	pwmLeft.stop()
	pwmRight.stop()
	GPIO.cleanup()
	sys.exit(0)

######################################
# メインルーチン
######################################
if __name__ == '__main__':

	try:
		while True:
			kb = readchar.readchar()
			sys.stdout.write(kb)

			if kb == 'w':
				speedHigh()
				moveForward()
			if kb == 'z':
				speedSlow()
				moveBack()
			if kb == 'a':
				speedSlow()
				moveLeft()
			if kb == 's':
				speedSlow()
				moveRight()
			if kb == 'x':
				moveStop()
			if kb == 'q':
				end()
			time.sleep(0.1)

	except KeyboardInterrupt:
		moveStop()
		end()
ラズタンクのモータードライバーと接続する[Gamepadで操作]
新しく nano で [raztank.py] を作って、コピペする
#!/usr/bin/env python
# -*- coding: utf-8 -*-

import RPi.GPIO as GPIO
import sys
import time
import asyncio
import websockets
import json

# ラズパイのGPIO番号は自分の配線と一致させること
constLeftPWM = 22
constLeftIN1 = 17
constLeftIN2 = 27
constRightPWM = 16
constRightIN1 = 21
constRightIN2 = 20

# GPIOの初期設定
GPIO.setwarnings( False )
GPIO.setmode( GPIO.BCM )
GPIO.setup( constLeftPWM,  GPIO.OUT )
GPIO.setup( constLeftIN1,  GPIO.OUT )
GPIO.setup( constLeftIN2,  GPIO.OUT )
GPIO.setup( constRightPWM, GPIO.OUT )
GPIO.setup( constRightIN1, GPIO.OUT )
GPIO.setup( constRightIN2, GPIO.OUT )

# PWM初期設定
pwmLeft = GPIO.PWM( constLeftPWM, 50 )  #50Hz
pwmLeft.start( 0.0 )
pwmRight = GPIO.PWM( constRightPWM, 50 )  #50Hz
pwmRight.start( 0.0 )

# モーター前進
def moveForward():
        GPIO.output( constLeftIN1, 1 )
        GPIO.output( constLeftIN2, 0 )
        GPIO.output( constRightIN1, 1 )
        GPIO.output( constRightIN2, 0 )

# モーター低速
def speedSlow():
        pwmLeft.ChangeDutyCycle( 80 )
        pwmRight.ChangeDutyCycle( 80 )

# モーター高速
def speedHigh():
        pwmLeft.ChangeDutyCycle( 100 )
        pwmRight.ChangeDutyCycle( 100 )

# モーターバック
def moveBack():
        GPIO.output( constLeftIN1, 0 )
        GPIO.output( constLeftIN2, 1 )
        GPIO.output( constRightIN1, 0 )
        GPIO.output( constRightIN2, 1 )

# モーター左
def moveLeft():
        GPIO.output( constLeftIN1, 0 )
        GPIO.output( constLeftIN2, 1 )
        GPIO.output( constRightIN1, 1 )
        GPIO.output( constRightIN2, 0 )

# モーター右
def moveRight():
        GPIO.output( constLeftIN1, 1 )
        GPIO.output( constLeftIN2, 0 )
        GPIO.output( constRightIN1, 0 )
        GPIO.output( constRightIN2, 1 )

# モーター停止
def moveStop():
        GPIO.output( constLeftIN1, 0 )
        GPIO.output( constLeftIN2, 0 )
        GPIO.output( constRightIN1, 0 )
        GPIO.output( constRightIN2, 0 )

# プログラム終了
def end():
        pwmLeft.stop()
        pwmRight.stop()
        GPIO.cleanup()
        sys.exit(0)

# デッドゾーン(微小な揺れを無視)
DEADZONE = 0.2

# ゲームパッドのレバー・ボタン検出
def get_left_stick_direction(axes):
    x = axes[0] if len(axes) > 0 else 0 # axes[0]:左スティックのX軸(左向き-1.0~右向き+1.0)
    y = axes[1] if len(axes) > 1 else 0 # axes[1]:左スティックのY軸(上向き-1.0~下向き+1.0)

    direction = []
    if abs(x) > DEADZONE:
        direction.append("← 左" if x < 0 else "→ 右")
    if abs(y) > DEADZONE:
        direction.append("↑ 上" if y < 0 else "↓ 下")

    return direction if direction else ["ニュートラル"]

# レバー取得とモーター駆動
async def handler(websocket):
    async for message in websocket:
        try:
            # ブラウザからwebsocketメッセージを取得する
            data = json.loads(message)
            # axesはスティックの値:[0]左レバーX軸, [1]左レバーY軸, [2]右レバーX軸, [3]右レバーY軸
            axes = data.get("axes", [])
            # レバー値の取得
            direction = get_left_stick_direction(axes)

            # デバッグ(検出したレバー名を表示する)
            print(f"direction='{direction}', direction[0]='{direction[0]}'" +
                (f", direction[1]='{direction[1]}'" if len(direction) > 1 else "") )

            # モーターを駆動する
            if direction[0] == "ニュートラル":
                moveStop()

            if direction[0] == "↑ 上":
                speedHigh()
                moveForward()

        except Exception as e:
            print(f"Gamepad取得エラー:{e}")

# メイン & 永久待機
async def main():
    print("🎧 WebSocketサーバー起動中(ポート8765)...")
    async with websockets.serve(handler, "0.0.0.0", 8765):
        await asyncio.Future()  # 永久待機

# ここからmain()を呼び出してずっと待機する
asyncio.run( main() )
以上