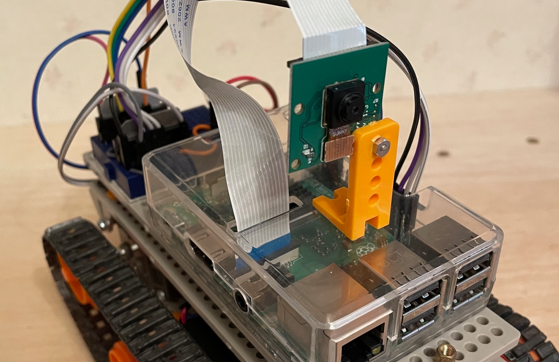
こちらのスクリプトは、Raspberry Piとカメラ、モーターを組み合わせて、赤色の物体を検出しながらラズタンク(ロボットカー)を自動運転するプログラムです。
プログラムの概要
目的:
- カメラ映像から赤色の物体を検出し、それに応じてロボットの進行方向を制御する。
特徴:
- OpenCVによる画像処理(赤色検出、輪郭検出、ラベリング)
- GPIO経由でモーター制御(進む、止まる、曲がる)
- 最大面積の赤色領域を中心に方向判断
- キーボード割り込みや例外処理付きで堅牢
ステップごとの解説
① 初期設定
cv2.VideoCapture():USBカメラ起動&映像パラメータ設定- GPIOでラズタンクのモーター制御ピンをセットアップ
② メインループ(main() 関数)
- カメラ画像を読み取り
- 上下反転で正しい向きに調整
detectRed()関数で赤色領域を抽出(HSV色空間利用)- 輪郭検出して視覚化
- ラベリングして最大の赤色領域を検出
③ 赤色の位置による行動判断
- 赤色の重心X座標から方向を判断
- 左端 → 左に曲がる
- 右端 → 右に曲がる
- 中央 → まっすぐ進む
- 表示メッセージとともにモーターを制御
④ 赤色が検出されない場合
- “No Red found”メッセージを表示してモーターを停止
⑤ 終了処理
KeyboardInterrupt(Ctrl+Cなど)で終了時にGPIOとカメラをクリーンアップ
detectRed関数のしくみ
HSV色空間で「赤色」を2つの範囲に分けて検出:
- 領域1:暗めの赤
- 領域2:鮮やかな赤
→mask1 + mask2で統合された赤色領域を出力
モーター制御関数
| 関数 | 動作 |
|---|---|
moveForward() | 前進 |
moveStop() | 停止 |
speedHigh() | 高速モード(Duty:100) |
speedCurveLeft() | 左旋回(右速・左遅) |
speedCurveRight() | 右旋回(左速・右遅) |
以下のPythonコードを分析して、自動運転のプログラムを開発しよう
pythonコードを新規ファイルで作ります
$ nano video-track.py
#!/usr/bin/env python
# -*- coding: utf-8 -*-
import RPi.GPIO as GPIO
import time
import sys
import cv2
from timeout_decorator import timeout
import numpy as np
import readchar

# -------------- カメラ設定
camera = cv2.VideoCapture(0) # 0 = Device ID
camera.set(cv2.CAP_PROP_FOURCC, cv2.VideoWriter_fourcc('Y','U','Y','V')) # YUYV = CODEC
camera.set(cv2.CAP_PROP_FRAME_WIDTH, 640)  # 320 640 800 1024
camera.set(cv2.CAP_PROP_FRAME_HEIGHT, 480) # 240 480 600 576
camera.set(cv2.CAP_PROP_FPS, 3) # 24 frame rate N per sec

# -------------- モーター設定
constLeftPWM = 17 #GPIO No.
constLeftIN1 = 27 #GPIO No.
constLeftIN2 = 22 #GPIO No.
constRightPWM = 16 #GPIO No.
constRightIN1 = 20 #GPIO No.
constRightIN2 = 21 #GPIO No.

GPIO.setwarnings( False )
GPIO.setmode( GPIO.BCM )
GPIO.setup( constLeftPWM,  GPIO.OUT )
GPIO.setup( constLeftIN1,  GPIO.OUT )
GPIO.setup( constLeftIN2,  GPIO.OUT )
GPIO.setup( constRightPWM, GPIO.OUT )
GPIO.setup( constRightIN1, GPIO.OUT )
GPIO.setup( constRightIN2, GPIO.OUT )

pwmLeft = GPIO.PWM( constLeftPWM, 50 )  #50Hz
pwmLeft.start( 0.0 )
pwmRight = GPIO.PWM( constRightPWM, 50 )  #50Hz
pwmRight.start( 0.0 )


######################################
# メインルーチン
######################################
def main():
  print('[1]\n[q][W][e]\n[A][S][D]\n[z][X][c] to STOP\n[1] to QUIT')
  while True:
    try:
      ret, frame = camera.read()                  # カメラ画像を取得
      if not ret:
        break

      imgPic = cv2.flip(frame,-1)                # 上下反転:-1
      # 元画像から赤色を検出する
      mask = detectRed( imgPic )                 # 赤色を検出
      #cv2.imshow( "Frame", imgPic )
      #cv2.imshow( "Mask", mask )
      # 検出した赤色の輪郭を見つける
      contours, hierarchy = cv2.findContours( mask, cv2.RETR_EXTERNAL, cv2.CHAIN_APPROX_SIMPLE )
      outputImg = cv2.drawContours( imgPic, contours, -1, (0,255,0), 3 )
      #cv2.imshow( "Fin", outputImg )
      #ラベリング処理, ラベリング画像に追加して、さらにブロブ(連続した領域)の領域(位置、幅、高さ)と面積、重心の情報を出力します。
      # nlabels=ラベル個数, labels=ラベリング画像, stats=[左上のx座標,y座標,幅,高さ,面積],center=ラベル毎の重心情報
      nlabels, labels, stats, center = cv2.connectedComponentsWithStats(mask)
      max_index = np.argmax(stats[:,4])    # 最大面積の赤色箇所を選ぶ
      #円を描画
      #for i in range(nlabels-1):
      #  cv2.circle(imgPic, (int(center[i+1][0]), int(center[i+1][1])), 10, (210, 200, 0), thickness=10)
      #print(nlabels, labels, stats, center, max_index)
      # 赤色を検出していないときはラベル数は1個なので、検出できた2個以上のときに丸印を追加する。
      if (nlabels > 1):
        cv2.circle(imgPic, (int(center[max_index+1][0]), int(center[max_index+1][1])), 10, (210, 210, 0), thickness=10)
        # 画面[640]の半分よりもどちら?
        intX = int(center[max_index+1][0])
        if ( intX > 420 ):
          cv2.putText( imgPic, "Go Right", (30,50), cv2.FONT_HERSHEY_SIMPLEX, 1, (255,0,0) )
          speedCurveRight()
          moveForward()
        elif ( intX < 220 ):
          cv2.putText( imgPic, "Go Left", (30,50), cv2.FONT_HERSHEY_SIMPLEX, 1, (255,0,0) )
          speedCurveLeft()
          moveForward()
        else:
          cv2.putText( imgPic, "Go Straight", (30,50), cv2.FONT_HERSHEY_SIMPLEX, 1, (255,0,0) )
          speedHigh()
          moveForward()
      else:
        #検出しなかったとき
        cv2.putText( imgPic, "No Red found", (30,50), cv2.FONT_HERSHEY_SIMPLEX, 1, (255,0,0) )
        moveStop()

      cv2.imshow( "Main", imgPic )

      key = cv2.waitKey(1)

    except IndexError:
      print("IndexError を無視します" + str(max_index) + str(stats) )

    except KeyboardInterrupt:
      camera.release()
      cv2.destroyAllWindows()
      pwmLeft.stop()
      pwmRight.stop()
      GPIO.cleanup()
      sys.exit()

# 赤色検出
@timeout(5) # measure()関数のタイムアウト時間を設定する
def detectRed( img ):
  hsv = cv2.cvtColor( img, cv2.COLOR_BGR2HSV )  # 色空間をHSVに変換(色相H, 彩度S, 明度V)
  # 領域1
  hsv_min = np.array( [100, 127, 0] )            # 赤色の範囲(最小)
  hsv_max = np.array( [30, 255, 255] )          # 赤色の範囲(最大)
  mask1 = cv2.inRange( hsv, hsv_min, hsv_max )  # 2色に変換するための領域2
  # 領域2
  hsv_min = np.array( [150, 127, 50] )            # 赤色の範囲(最小)
  hsv_max = np.array( [180, 255, 255] )          # 赤色の範囲(最大)
  mask2 = cv2.inRange( hsv, hsv_min, hsv_max )  # 2色に変換するための領域2
  return mask1 + mask2

# ------------------------- ラズタンクのモーター
def moveForward():
	GPIO.output( constLeftIN1, 1 )
	GPIO.output( constLeftIN2, 0 )
	GPIO.output( constRightIN1, 1 )
	GPIO.output( constRightIN2, 0 )

def speedSlow():
	pwmLeft.ChangeDutyCycle( 80 )
	pwmRight.ChangeDutyCycle( 80 )

def speedHigh():
	pwmLeft.ChangeDutyCycle( 100 )
	pwmRight.ChangeDutyCycle( 100 )

def speedCurveRight():
	pwmLeft.ChangeDutyCycle( 100 )
	pwmRight.ChangeDutyCycle( 30 )

def speedCurveLeft():
	pwmLeft.ChangeDutyCycle( 30 )
	pwmRight.ChangeDutyCycle( 100 )

def moveBack():
	GPIO.output( constLeftIN1, 0 )
	GPIO.output( constLeftIN2, 1 )
	GPIO.output( constRightIN1, 0 )
	GPIO.output( constRightIN2, 1 )

def moveLeft():
	GPIO.output( constLeftIN1, 0 )
	GPIO.output( constLeftIN2, 1 )
	GPIO.output( constRightIN1, 1 )
	GPIO.output( constRightIN2, 0 )

def moveRight():
	GPIO.output( constLeftIN1, 1 )
	GPIO.output( constLeftIN2, 0 )
	GPIO.output( constRightIN1, 0 )
	GPIO.output( constRightIN2, 1 )

def moveStop():
	GPIO.output( constLeftIN1, 0 )
	GPIO.output( constLeftIN2, 0 )
	GPIO.output( constRightIN1, 0 )
	GPIO.output( constRightIN2, 0 )

# ----------------------------メインをスタート
if __name__ == '__main__':
    main()
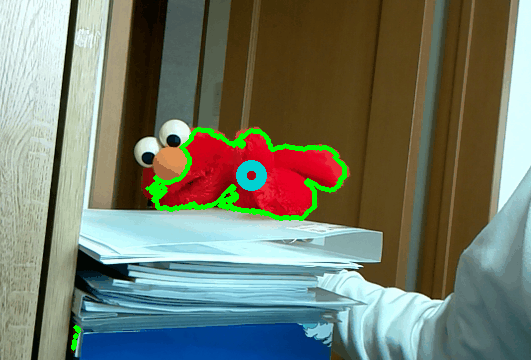
赤色だけを検出したサンプル。